Do you have an old pair of jeans or a t-shirt that you love, but they are looking a bit plain or out-of-style? D.I.Y fashion projects are a great way to revitalize your wardrobe while saving money! It can also turn into a fun afternoon with friends.
Need some inspiration? Here are a few fun D.I.Y projects that will leave you walking away with some great new pieces for your closet:
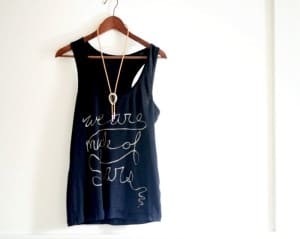
Bleaching your shirt with a funky phrase: Bleach can be a pain to work with, but it also has serious craft potential. Transform a simple, plain t-shirt or tank top into an original one-of-a-kind piece of clothing by creating your own quote or phrase.
- Place a flat sheet of cardboard inside your shirt. This will provide an even surface for your design and will stop the bleach from bleeding through. With a piece of white chalk, sketch out your design. Don’t worry if you need to smudge out chalk lines. They wash out once your painting is done.
- Secure your shirt by folding the sides under the cardboard, using elastics or clips to keep it from slipping. Prepare a small bowl with non-diluted, fabric safe bleach. Have your towel on hand to wipe up any drips.
- It’s time to make your design permanent! Dip your brush in the bleach and drag it on the edge of the bowl to eliminate dripping. Use steady strokes to trace the chalk lines of your design. For an even bleach line, you will need to reload your brush every two inches. You will quickly see your design appear, like magic!
- Continue to trace your design until you reach the end. Take a break, and return in a few minutes once the bleach has had time to react with the fabric of your shirt. Are there un-even spots or light areas? No problem. Simply go back in with your bleach filled brush and even out the design.
- Once you’re pleased with how your shirt looks, let the piece sit in the sun for an hour or more. This will allow the bleach to process and lighten. Depending on the cotton content of your shirt, the color of your design will range from dark red, to orange, to pink, all the way to white. Rinse and hand wash your shirt, and hang to dry. Your design is now permanent, safe to wash with like colors, and ready to wear.
Adapted from http://luneblog.com/
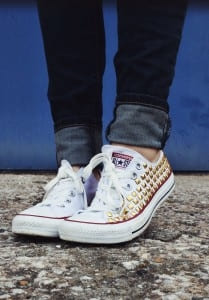
Studded converse shoes: Converse are a pretty hip shoe, but their plain-Jane style can get a bit boring after awhile. Here is a way to glam up your shoes on a budget and also cover up any mud stains if you have a lighter colored shoe.
- You’ll need around 40 studs per shoe for a 7.5 size shoe and some E6000 glue. This strong glue will ensure those studs stay on despite the rain and much it may travel through.
- In a well-ventilated area glue your studs onto the outer edges of your shoe, working your way from the bottom to the top. Allow the glue to dry for 24 hours before wearing them. Save a few extra studs in case you lose one at some point. If any are going to fall off they’ll probably go in the first day or two!
Adapted from http://www.abeautifulmess.com/2013/11/make-your-own-studded-converse.html
D.I.Y cut-up back: There is nothing sexier than a shirt that reveals a bit of your back. SweetCandyLine teaches D.I.Y lovers how to covert a regular tee into a masterpiece using a pair of scissors and a little bit of ingenuity. Watch the live video to learn how!
Posted by SweetCandyLine, adapted from https://www.youtube.com/channel/UCTO_Atwt8ThyDAvLrvAZ7kQ
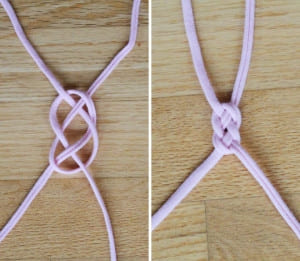
Celtic headband made from old t-shirt: Here is a great D.I.Y that uses an old t-shirt to make a beautiful headband. It is a great way to recycle old clothing and create inexpensive accessories from your hair.
- Cut a strip from the t-shirt and stretch it until the material is thin.
- Cut the strip into two parts.
- Tie into Celtic knot (pictured above)
- Tie the headband together and as an extra option, cover with another piece of material to hide the tie.
- Enjoy your new hairpiece!
Adapted from http://www.jsonline.com/features/fashion/Old-T-shirt-becomes-DIY-headband-bracelet-230900631.html
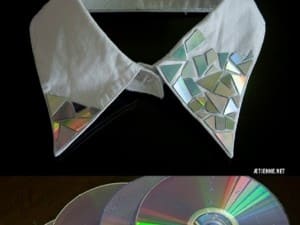
D.I.Y CD Bling Collar: CDs are becoming a thing of the past and this D.I.Y provides a creative, easy, and seriously fashionable way to re-use the groovy tunes.
- Place CDs in hot water for five minutes to remove plastic covering.
- Cut CD in half.
- Remove plastic coating on the CD.
- Cut up CD into pieces (be careful not to hurt yourself).
- Use crazy glue to stick the pieces onto a collared shirt (or make a shape on another shirt).
- Voila! Here is your new blinged up shirt!
Adapted From http://followfashion.nl/diy-fashion-report-pimp-je-kraag